
You are looking for information, articles, knowledge about the topic nail salons open on sunday near me artefact the last of us 2 on Google, you do not find the information you need! Here are the best content compiled and compiled by the toplist.tfvp.org team, along with other related topics such as: artefact the last of us 2 last of us 2 collectibles, last of us 2 trading cards, powerpyx last of us 2 collectibles, the last of us part 2 locations, master set last of us 2, what is the strange artifact last of us 2, last of us 2 fetch, last of us 2 all notes
[su_youtube_advanced url=”https://www.youtube.com/watch?v=2e_z7y3_m00″]
The Last of Us 2 collectibles guide – Polygon
- Article author: www.polygon.com
- Reviews from users: 4643
 Ratings
 - Top rated: 4.8
- Lowest rated: 1
- Summary of article content: Articles about The Last of Us 2 collectibles guide – Polygon The Last of Us Part 2 collectibles gues. Find every Artifact, Trading Card, Coin, Journal Entry, Workbench, Safe and combination, and Training Manual. …
- Most searched keywords: Whether you are looking for The Last of Us 2 collectibles guide – Polygon The Last of Us Part 2 collectibles gues. Find every Artifact, Trading Card, Coin, Journal Entry, Workbench, Safe and combination, and Training Manual. Find every Artifact, Trading Card, Coin, Journal Entry, Workbench, Safe and combination, and Training Manual
- Table of Contents:
Share this story
Share this story

The Last of Us 2 Strange Artifact: how to find the Precursor orb | TechRadar
- Article author: www.techradar.com
- Reviews from users: 27248 Ratings
- Top rated: 3.7
- Lowest rated: 1
- Summary of article content: Articles about The Last of Us 2 Strange Artifact: how to find the Precursor orb | TechRadar The Strange Artifact not only acts as a The Last of Us 2 collectible, it’s also an Easter Egg. It’s a Precursor orb, previously seen in Naughty … …
- Most searched keywords: Whether you are looking for The Last of Us 2 Strange Artifact: how to find the Precursor orb | TechRadar The Strange Artifact not only acts as a The Last of Us 2 collectible, it’s also an Easter Egg. It’s a Precursor orb, previously seen in Naughty … Find the Strange Artifact in The Last of Us 2 to unlock the Relic of the Sages trophy.
- Table of Contents:
The Last of Us 2 Strange Artefact location revealed
Where to find the Last of Us 2 Strange Artifact
The Last of Us Part 2: All 127 Artifact Locations | Digital Trends
- Article author: www.digitaltrends.com
- Reviews from users: 25947 Ratings
- Top rated: 4.7
- Lowest rated: 1
- Summary of article content: Articles about The Last of Us Part 2: All 127 Artifact Locations | Digital Trends The Last of Us Part II has a lot of collectibles, from trading cards and coins to safes and workbenches. Out of all of them, though, … …
- Most searched keywords: Whether you are looking for The Last of Us Part 2: All 127 Artifact Locations | Digital Trends The Last of Us Part II has a lot of collectibles, from trading cards and coins to safes and workbenches. Out of all of them, though, … Artifacts are, by far, the most daunting collectibles in The Last of Us Part 2. We’ve compiled a list for all 127 of them to make the process easier for you.
- Table of Contents:
Chapter 2 Waking Up
Chapter 3 The Overlook
Chapter 4 Patrol
Chapter 7 Packing Up
Chapter 8 The Gate
Chapter 9 Downtown
Chapter 10 Eastbrook Elementary
Chapter 11 Capitol Hill
Chapter 12 Channel 13
Chapter 13 The Tunnels
Chapter 14 The Theater
Chapter 15 The Birthday Gift
Chapter 16 Hillcrest
Chapter 17 Finding Strings
Chapter 18 The Seraphites
Chapter 20 Road to the Aquarium
Chapter 21 The Flooded City
Chapter 23 Tracking Lesson
Chapter 25 On Foot
Chapter 26 The Forward Base
Chapter 28 Hostile Territory
Chapter 30 The Forest
Chapter 31 The Coast
Chapter 33 The Shortcut
Chapter 34 The Descent
Chapter 35 Ground Zero
Chapter 37 The Marina
Chapter 38 The Island
Chapter 42 2425 Constance
Chapter 43 Pushing Inland
Chapter 44 The Resort
Collectibles : artefacts – Soluce The Last of Us Part 2, guide, astuces – jeuxvideo.com
- Article author: www.jeuxvideo.com
- Reviews from users: 770 Ratings
- Top rated: 3.1
- Lowest rated: 1
- Summary of article content: Articles about Collectibles : artefacts – Soluce The Last of Us Part 2, guide, astuces – jeuxvideo.com Venez découvrir tout ce qu’il faut savoir sur la partie : “Collectibles : artefacts” du jeu The Last of Us Part II dans son wiki. …
- Most searched keywords: Whether you are looking for Collectibles : artefacts – Soluce The Last of Us Part 2, guide, astuces – jeuxvideo.com Venez découvrir tout ce qu’il faut savoir sur la partie : “Collectibles : artefacts” du jeu The Last of Us Part II dans son wiki. Venez découvrir tout ce qu’il faut savoir sur la partie : “Collectibles : artefacts” du jeu The Last of Us Part II dans son wiki.
- Table of Contents:
artefact the last of us 2
- Article author: gamefaqs.gamespot.com
- Reviews from users: 11306 Ratings
- Top rated: 5.0
- Lowest rated: 1
- Summary of article content: Articles about artefact the last of us 2 For The Last of Us Part II on the PlayStation 4, a GameFAQs message board topic titled “Chapter select / missing artefacts & collectibles”. …
- Most searched keywords: Whether you are looking for artefact the last of us 2 For The Last of Us Part II on the PlayStation 4, a GameFAQs message board topic titled “Chapter select / missing artefacts & collectibles”.
- Table of Contents:
See more articles in the same category here: toplist.tfvp.org/blog.
The Last of Us 2 collectibles guide
The Last of Us Part 2 is filled with collectibles like Artifacts, Trading Cards, Journal Entries, Workbenches, Safes, and Coins, and our guides will show you how to find them all — as well as every Safe and code / combination and every Training Manual.
You can start with our guide for Jackson, where you begin The Last of Us Part 2.
We’ve organized our The Last of Us Part 2 guides by chapters and the sections (or subchapters) within them. If you just follow along with the table of contents at the bottom of every guide, you’ll go straight to the next guide for the next chapter.
We list The Last of Us Part 2’s chapters in a table of contents above, but we’ve broken it up a bit to hide some of the surprises. That’s pretty great segue for us to talk about The Last of Us Part 2 spoilers, in fact.
We’ve done our best to avoid showing you anything that might even arguably be perceived as a spoiler, but the developers at Naughty Dog kept a lot of secrets about this game during development. We’re saying that there’s a lot you probably don’t know — because we sure didn’t. Even the chapter names arguably contain spoilers. We’re being super cautious, is what we’re saying, because it’s better to be surprised.
The Last of Us 2 Strange Artifact: how to find the Precursor orb
On the hunt for the Last of Us 2’s Strange Artifact? Then you’ve landed on the right page. The Strange Artifact is an easy collectible to miss, but finding the hidden Easter Egg unlocks the Relic of the Sages (bronze) PlayStation trophy – and gives you that warm, fuzzy feeling you get when you find a hidden item.
The Strange Artifact not only acts as a The Last of Us 2 collectible, it’s also an Easter Egg. It’s a Precursor orb, previously seen in Naughty Dog’s Jax and Daxter series, where the item served as both a collectible and a type of currency. Pretty cool, huh?
If you missed this Easter Egg on your first playthrough, don’t worry, you can always scoop it up (along with any other missed collectibles) through The Last of Us 2’s New Game + mode, which allows you to replay the game with all of the upgrades you obtained in your first playthrough.
If you want to know where to find The Last of Us 2 Strange Artifact then read on – but, be warned, there are spoilers for The Last of Us 2 ahead.
The Last of Us 2 review: the game of the generation
These are the best PS4 games so far
Where to find the Last of Us 2 Strange Artifact
(Image credit: Naughty Dog)
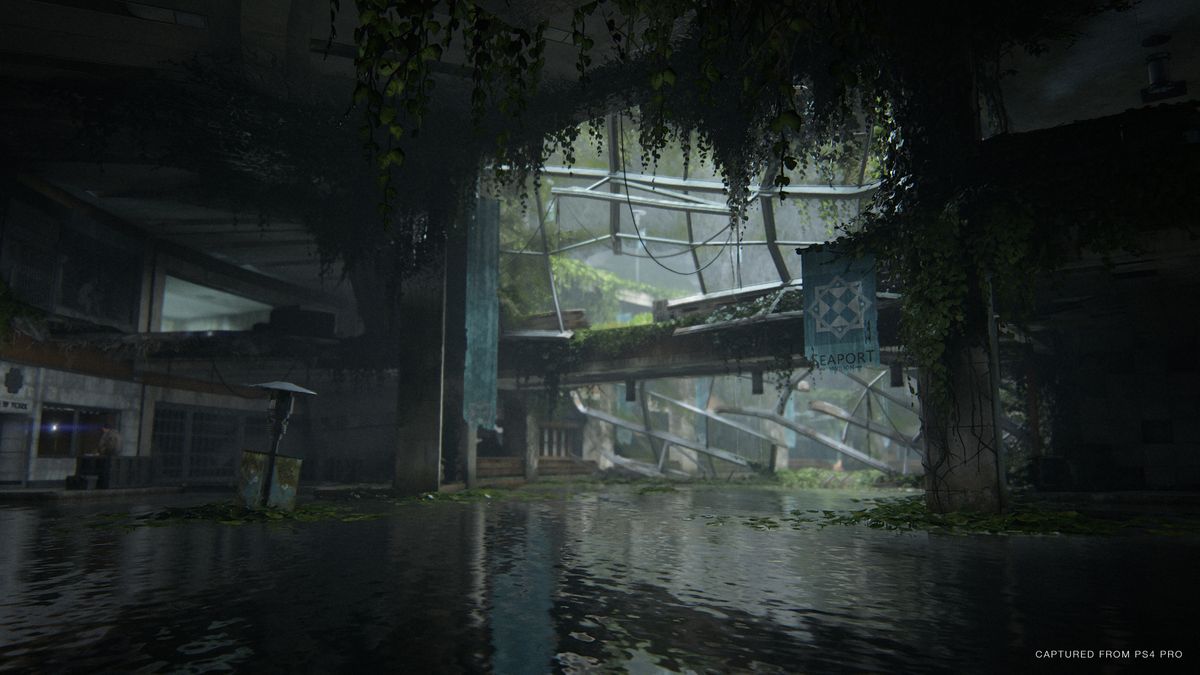
You can pick up the Strange Artifact in the Hostile Territory chapter of The Last of Us 2 – Seattle Day 1 for Abby – which takes place after the aquarium flashback chapter. Early in the chapter, you should come across Seattle China Town, an alley lined with a bakery, bar and pharmacy (and dragon graffiti down the side of the buildings).
First things first: enter the Ruby Dragon bar, open the door inside and head up the staircase to the second floor. Crawl under a blockade and enter the next room, which should be occupied by some pesky Clickers. Kill the Clickers, then jump over the gap to the left of where you came in, to the building across the street.
The balcony you land on should have a staircase going up to the roof, but nearby is another room with a hole in the floor. Head into that room with the hole in the floow, but don’t jump down. Instead, check out the table with the fan that’s up against the wall – on that should be the Strange Artifact (AKA the Precursor orb).
Picking up the artifact should cause the Relic of the Sages trophy to pop. Simple as that.
The Last of Us Part 2: All 127 Artifact Locations
The Last of Us Part II has a lot of collectibles, from trading cards and coins to safes and workbenches. Out of all of them, though, the artifacts are the most daunting. There are 127 artifacts in The Last of Us Part II, and unlike most collectibles, they show up in nearly every chapter. From Chapter 2 to Chapter 44, here are all of the artifact locations in The Last of Us Part II.
We’re not going to talk about any plot details, but, naturally, there are spoilers ahead. Grabbing all 127 artifacts, as well as all 20 journal entries, will earn you the gold trophy Archivist, as well as two bronze trophies for specific artifacts. You’ll need both for the gold trophy, so make sure to keep our journal entry guide handy to get everything in a single playthrough.
Further reading
Chapter 2: Waking Up
Volunteer receipt
From the beginning of the chapter, follow Jesse through town until you reach a four-way intersection. You’re supposed to go into the bar on your left. Instead, continue straight, past a dog and a blacksmith on your right until you reach a truck filled with logs blocking the road. To the right of this truck, under some scaffolding, you’ll find this artifact on a wooden crate.
Chapter 3: The Overlook
Artifact #2
About halfway through the chapter, you’ll need to crawl under a house to progress. An Infected will crawl toward you from the other side, and you’ll have to kill it, so be careful. Once you emerge, turn left, and look for an open window to the house you just crawled under. Inside, go to the left side of the house, and you’ll find this artifact on a desk.
Chapter 4: Patrol
A note to Santa
The first artifact doesn’t come until further into this chapter. After the lookout, Ellie and Dina will get back on their horses. Dina will point out a group of houses once you start riding again. Dismount and head to the right side of the house on your left. Climb up to the bedroom, and you’ll find this artifact in the nightstand drawer. There are a couple of supplements in the bathroom, too.
Supermarket apology
Later, Ellie will crawl under a truck and be attacked by an Infected. After Dina intervenes, enter the back of the truck via the building on your right. Inside, you’ll find this artifact along with eight supplements.
Good boy combo
Inside the spore-infested area, continue until you need to squeeze through a gap in the wall. You’ll need to squeeze through two eventually, but avoid the second one for now (progressing here locks you out of the collectible). Head to the office to find this artifact on a desk, next to a safe.
Eugene’s firefly pendant
This artifact is unmissable. Continue on the main story path, and before going through a door later in the level, Ellie will automatically pick up Eugene’s firefly pendant.
Eugene’s ultimatum
Continue through the next door and loop around the right side of the next room. This artifact is in the nightstand by a bed on the far side of the room.
Photo of Tommy and Eugene
From the last artifact, turn around, and you’ll find this artifact on the table directly in front of you.
Chapter 7: Packing Up
Joel’s watch
This artifact is unmissable. In Joel’s house, on the upper floor, you’ll find the watch in a red box on the bed.
Chapter 8: The Gate
Map of Seattle
At the beginning of the chapter, you’ll ride down an overgrown highway. Before the Seattle exit sign, dismount your horse and enter the construction trailer on your left. This artifact is in a drawer inside.
Refugee note
Later, you’ll come to an open area with “WLF Trespassers Killed On Sight” spray-painted on a gate. Head to the construction trailer on your left. Inside, you’ll find this artifact sitting on a table.
Infected info graph
Head to the trailer immediately behind the one with the last collectible, and you’ll find this artifact on a table inside.
Isaac’s orders
Continue on the main story path. You’ll need to climb up the security checkpoint and cross it. Once you reach the second watchtower, there’s a ladder leading down directly in front of you. Instead of going down it, turn around and use the ladder leading up behind the door. This artifact is in the room at the top.
Checkpoint gate codes
From the last artifact, head down both ladders and leave the watchtower. This artifact is in the trailer directly in front of you (break the windows to enter).
Rooftop note
The next artifact is on top of the trailer that the previous artifact is inside. To reach it, throw the yellow cable over the trailer, head to the other side, and climb to the top. Use the above image for reference on how to reach it.
Chapter 9: Downtown
FEDRA census
After you automatically dismount your horse at the beginning of the chapter, check the guard post on the left for this artifact.
Bank Heist Plans
Once you enter the open-world section, head to your left toward the skyscraper (the Westlake Bank). Enter through the front, deal with the Infected inside, and head toward the back office on the left side of the lobby. The artifact is inside a purse on the floor.
Bank robber letter
Don’t leave the bank yet. Open the vault door in the same room as the previous artifact (the code is 60-23-06, revealed from the previous artifact). You’ll find this artifact on the table inside.
Antique ring
Still in the vault, you’ll find this artifact in one of the safety deposit boxes. You’ll earn the So Great and Small bronze trophy when you pick it up.
Cache hunter note
Leave the bank and head to the “building” in the bottom left corner of the intersection between 6th Avenue and Colombia Street. It looks like a building on the map, but it’s really just a small concrete structure. The artifact is in a purse on the ground inside.
Letter from Isaac
Using the map as a reference, head to the left of the previous collectible. Look for a tank at the bottom of a set of stairs. To the left of the tank, you’ll find this artifact in a purse.
WLF community supply chest note
Head toward Madison Street. In the build between 5th Avenue and 6th Avenue, you’ll find this artifact at the top of some stairs, inside another purse.
Street drawing
At the corner of 5th Avenue and Madison Street, you’ll find a security checkpoint. Climb up the ladder, and you’ll find this artifact in a drawer in the second watchtower.
WLF safe house supply note
Head to the corner of Spring Street and 5th Avenue. There, you’ll find a Ruston Coffee shop with wanted posters on the windows. Smash the windows, head inside, and you’ll find this artifact on the counter.
Pet store key
Still inside Ruston Coffee, you’ll find this artifact in the restroom. Be careful, though. There’s an Infected inside that will attack you when you enter.
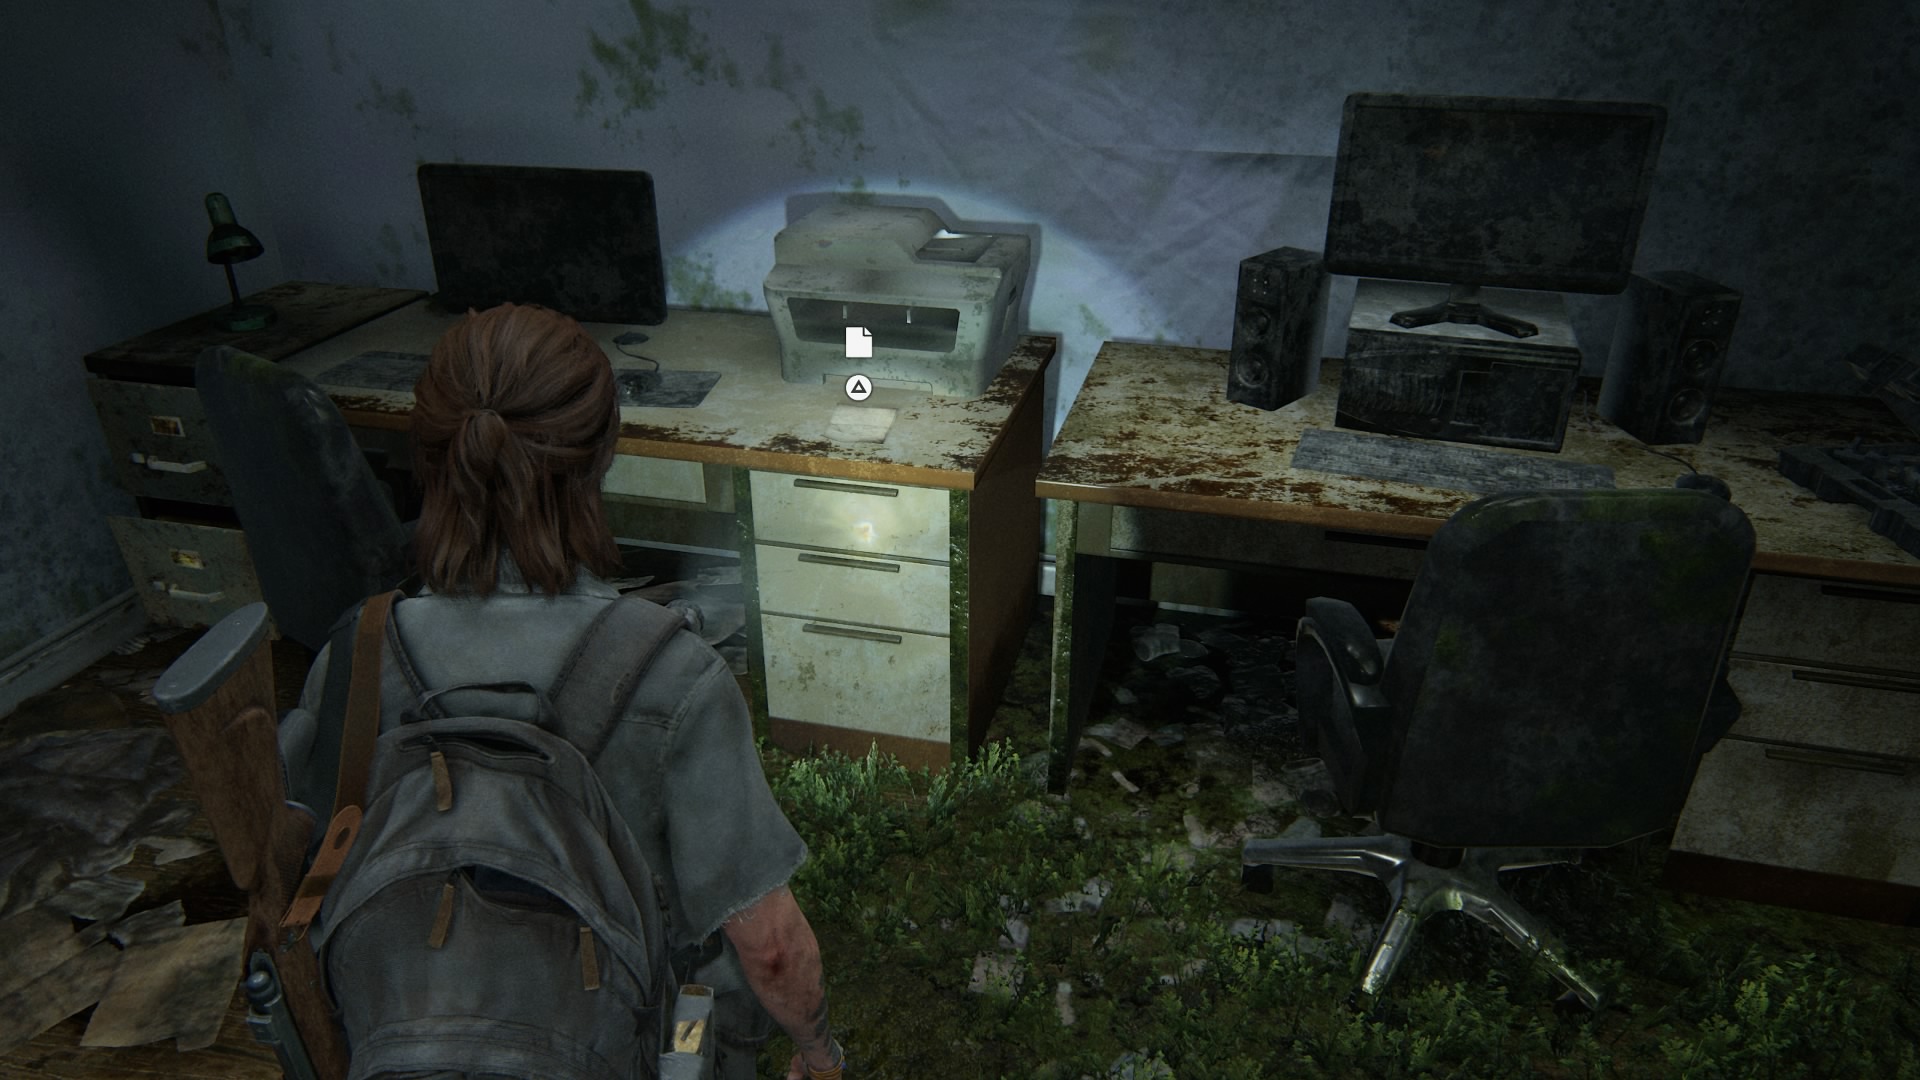
Join WLF note
Now that you have the pet store key, head to the corner of Marion Street and 6th Avenue. Go through the alley with “Barko’s Deliveries” painted on the wall, and enter Barko’s Pet Store using the key you just picked up. Head inside and open the first door on your left. In the next room, you’ll find the artifact sitting on top of a printer. You can also pick up a holster and the stun bomb inside the pet store.
Note to informant
Head toward the water between 6th Avenue and Madison Street. Open the back doors of the FEDRA truck in the middle of the water, near several small waterfalls. After a short cutscene, pick up the artifact in the back of the truck.
Emergency protocols memo
Go the synagogue — the “dome”– and enter through the security gate on the left side. Climb up the ladder to the watchtowers in front, and in the first one, you’ll find this artifact in the drawer.
Rabbi Saunders’ letter
Continue into the synagogue, solve the puzzle inside, and use the rope on the upper level to swing to an otherwise unreachable balcony. This is part of the main story path, so don’t worry about missing it. Once you reach the balcony, head to the office on the right side, and you’ll find this artifact on the desk. Picking it up will automatically unlock a journal entry, too.
Plea to a friend
Head to the courthouse — part of the main story path — and deal with the Infected inside. Continue downstairs, and at the end of a long hallway, you’ll see a FEDRA sign. Under the sign, one of the corpses has the artifact on them.
Lt. Torres’ final memorandum
From the last artifact, turn around and smash the window on your left. Inside the office, pull the machete out of the corpse leaning against the wall. Once you do, an artifact will fall on the floor.
List of WLF agitators
To the left of the last artifact, interact with the filing cabinet for this one.
WLF recruiter journal
Continue on the main story path until you reach the Serevena Hotel. Head upstairs and enter the room directly in front of you at the top. In the room on your right, check the drawer under the TV. You’ll find this artifact there.
Chapter 10: Eastbrook Elementary
Leah’s note and Leah’s photograph
These two artifacts come at the same time, and better yet, they’re unmissable. After killing your captor, you’ll automatically pick up both.
Issac’s mandate
After you encounter some enemies on a rooftop, head into the next room on the main story path. Inside, on the table in front of you, is this artifact.
Chapter 11: Capitol Hill
Chevy’s apology
Next to the swimming pool toward the beginning of the chapter, head to the door marked with a “6.” Go upstairs inside the house, and you’ll find this artifact lying on the bed.
Raul’s olive branch
Continue on the main story path until you reach the Capitol Inn motel. Inside the complex, on the right, you’ll find a dumpster. Move it below the open balcony directly above you. Climb inside, and you’ll find this artifact in a drawer in the kitchen.
Rebecca’s tip-off
Past the motel, continue left until you reach a gas station. Deal with the enemies in the area, and head into the bookstore directly across from the gas station. Head to the coffee shop section, and you’ll find this artifact next to a sink behind the counter.
Tower doodles
Continue on the main story path until you see a Clicker run into a wire trap and explode. Continue past this until you reach a muddy slope. Don’t slide down it yet! Instead, look to your right for a ladder. This artifact is at the top, along with 13 parts.
Raul’s account
Slide down the muddy slope and continue to the other side of the water. On the other side, look inside the back of the truck parked on the right. There, you’ll find this artifact.
Fran’s refusal
Shortly after, you’ll find a dead horse and come to a street littered with wire traps. In the first building on your right — the martial arts studio — you’ll find this artifact hanging on a bulletin board in the back.
Thrift store reminder
In the donation center, directly across from the previous building, head through the door with a “Do Not Enter” sign in front. On a bulletin board, in front of the vending machine, you’ll find this artifact.
Chapter 12: Channel 13
Dad’s pep talk
This one comes late in the chapter. After the cutscene with Leah’s dead body, check the offices on the same floor. In the one nearest to the open window, you’ll find this artifact on the couch.
Chapter 13: The Tunnels
Subway note
After setting a group of Infected against some human enemies, Ellie and Dina will enter a train car. Go to the end of the train, and you’ll find the artifact hanging on the wall on the left.
Whittled statue
Later, you’ll lift a chain door to progress through the chapter. Continue on the main story path until you reach a cafeteria. Next to the entrance door, by a microwave, you’ll find this artifact.
Locker room note
In the same room, check the table for this artifact.
Soda can note
Still in the same room, smash the glass on the Special Cola vending machine to find this artifact inside.
Subway station note
Later, you’ll need to climb a red vending machine tipped on its side to progress. In the train car you enter, this artifact is pinned on the door.
Chapter 14: The Theater
Cassandra program
Inside the theater, on the ground floor, head to the back where the counter is. To the left of the counter, on a crate, you’ll find this artifact.
Lone FEDRA soldier journal #1
From the last collectible, head upstairs. Before going to the smaller set of stairs, go to the balcony that points toward the front of the theater. You’ll find this artifact on a table there.
Lone FEDRA soldier journal #2
By the stairs, open the door with “Employees Only” on the front. At the top of the smaller set of stairs, enter the projection room on your left. Inside, the artifact is on top of a radio transmitter.
The Sick Habit set list and flyer
Head downstairs and into the actual theater. Climb onto the stage, but don’t go backstage yet. Look to a box on the right side for this artifact.
Chapter 15: The Birthday Gift
Suicide note
In the history museum, you’ll come to a display with an elk surrounded by wolves. Turn left, and head into the dark exhibit. Continue straight until you can turn right, where you’ll find a hole in the wall. Crawl through the hole to find this artifact on the floor in the following room.
Chapter 16: Hillcrest
Join WLF note
From the start of the chapter, enter the third building on the left (the laundromat). The artifact is on a desk in the back office.
Boris’ daughter drawing
Head back to the main road and enter the second building on the right (the Rosernont clothing store). Behind the counter, crawl through the hole in the wall and drop to the lower level. Down there, you’ll find a workbench, as well as this artifact.
Yolanda’s note
Continue on the main story path. Shortly after the last collectible, you’ll need to climb over a truck with Ruston Coffee on the other side. To the left of Ruston Coffee is a bookstore. This artifact is inside on the counter.
Need a plan note
You’re supposed to squeeze out of the bookstore through a crack in the wall to progress the story. Instead, head out the front of the bookstore and turn right. Continue straight until you come to the Caroline Paper Co. building. The artifact is lying on the center table inside.
Condolence note
Later in the chapter, you’ll use a dumpster to climb onto a balcony. There, you’ll find a workbench. Facing the workbench, turn around and head through the door in the bottom left corner. Inside that next room, you’ll find this artifact on a desk.
Hillcrest tattoo parlor note
Continue out of the last building until you’re outside again. You should see a Goldstar Liquor building to your right. Diagonally across from there, enter the Velvet Tattoo shop. This artifact is on a desk in the back office.
Turn in Boris note
Directly across from the tattoo shop, enter the pet store and smash the windows in the back. In that back room, you’ll find this artifact next to the sink.
Dale’s combo
Still in the pet store, head through the very large hole in the wall into a bar. This artifact is hanging on the wall in the back room of the bar.
Boris’ confession
Later in the chapter, you’ll see some black smoke in the distance. Continue on the main story path, where you jump over a fence into a backyard. You’ll find this artifact inside the house, on the coffee table.
Rosemont’s flyer
From the last artifact, turn around and head toward the kitchen. This artifact is on a side table right before the kitchen.
Chapter 17: Finding Strings
Tara’s invitation
Late in the chapter, when you’re with Joel, you’ll enter a hotel and put your mask on. The artifact is inside room 107 on a small table.
Chapter 18: The Seraphites
WLF target list
After the Quickmart you enter at the beginning of the chapter, head to the Kingsgate Brewing Company building. Inside, deal with all of the Infected. One of them will drop the artifact — it’s usually the last one you kill.
Last letter to husband
Head out of the previous building and go to the conference center (slightly to the left of the previous building). Inside, turn left and work your way to the upper floor via the elevator shaft. On the upper floor, smash the leftmost windows, then, using the nearby bottles, smash the leftmost panes of glass hanging over the windows. Take the nearby yellow cable and throw it over the metal bars supporting the hanging window panes. Jump to the rope, and use it to swing across to a balcony on the other side of the building. Head through the window there, and you’ll find the artifact on the floor inside.
Evacuation letter
Jump off the balcony and continue straight under an overpass. At the end, you’ll see a black cat running left. Follow it toward a truck parked outside of an apartment building. Use the truck to climb to the apartment building’s balcony and enter the apartment on your right. This apartment is only reachable using the outside balcony, so don’t go through the main hallway. The artifact is inside on a table in the kitchen.
WLF deserter letter
Head out of the apartment with the previous artifact to the apartment directly across the hall. In the kitchen, you’ll find a workbench, and after interacting with it, four human enemies will attack you. Deal with them, and go into the bedroom closest to the front door. Inside, you’ll find the explosives training manual, as well as this artifact.
Dying husband’s plea
Later in the chapter, you’ll come out of the sewers, and a group of Scars will confront you. Deal with them, then head inside the Garden Suites building toward the left of the encounter. Go up the stairs inside and into the apartment at the top. Go straight through the apartment to the fire escape, head up, and enter the apartment at the top. The artifact is inside, next to a corpse.
Pharmacy note
Later in the chapter, you’ll drop into some water. To your left, there’s a Weston’s Pharmacy sign. Head inside, and you’ll find this artifact behind the counter. There’s also a trading card, safe, and workbench inside. The artifact reveals the safe code.
Hospital supply list
Once you’re in the hospital, after the enemy encounter inside, use the stairs to go up one level. Slightly to the left of where you emerge, enter the room, and you’ll find the artifact on a table inside.
Chapter 20: Road to the Aquarium
Garage note
About a quarter of the way into the chapter, Jesse and Ellie will swim toward a parking garage. Inside the garage, deal with the Infected, then head toward the back. There, you’ll find a car that you can climb to reach a ramp leading to the next level. The artifact is at the end of the ramp.
Bookstore note
Continue on the main story path until you enter the Kingston’s Bookstore. Drop to the lower level, and head to the children’s section in the corner. The artifact is on a table there.
Textile note
Continue until the next enemy encounter. After dealing with the enemies, head into Rachel’s Fabrics on your right through the cafe area on the left side of the building. Go up the stairs, and you’ll find this artifact pinned to the wall in the room at the top.
Chapter 21: The Flooded City
Stash note
From the start of the chapter, continue in your boat until you’re forced to leave and open a chain door. Before opening the door, head left toward a set of stairs. In the room at the top of the stairs, you’ll find a journal entry prompt, along with this artifact.
Shambler note
Open the chain door and return to your boat. Continue straight until you need to restart the engine. Once you do, head to the left of the building in front of you until you spot the Carthy Hotel. The artifact is inside, next to a corpse.
Sniper’s note
From the previous artifact, continue back outside until you reach a building with some Scars inside. Instead of taking them on, take your boat to the left. Head into the destroyed train until you reach a locked door. Next to it, you’ll find a yellow cable. Throw it over the right side of the train so it’s hanging out the open door. Jump to the cable and use it to climb to the roof of the train. Enter the locked train car through the security hatch, and you’ll find this artifact sitting on one of the benches inside. This is an excellent vantage point, too, so it’s a good idea to pick off some Scars while you’re inside the train.
Encampment note
Leave the train and deal with the enemies inside the brightly lit building in front of you. This artifact is in that building, pinned to the wall on the upper floor.
W&B Arcade flyer
Continue in your boat until the game forces you to get out in the W&B Arcade. This artifact is on a table directly under the W&B Arcade sign inside.
Arcade note
After you take down the Bloater inside the arcade, head upstairs and enter the PC Café on your right. This artifact is hanging on the wall directly left of the entrance.
Chapter 23: Tracking Lesson
Owen’s drawing and thank-you card
Both of these artifacts are in your inventory at the start of the chapter.
Zoo holiday brochure
Continue through the zoo until you reach a gazebo. This artifact in on a bench under the gazebo.
Chapter 25: On Foot
WLF gun cache note
Late in the chapter, Abby and Mel will meet up with Manny. Behind him, there’s a rusty construction trailer. Smash the windows and jump inside. There, you’ll find a coin and this artifact.
Chapter 26: The Forward Base
WLF interrogator letter
Toward the end of the chapter, you’ll enter a building where Manny will stop and talk to a few people eating at a table. You’ll walk through various tents throughout this chapter, but the artifact is located in a building, not the tents. In front of the hallway with prison cells, this artifact is sitting on a small table.
Chapter 28: Hostile Territory
Scar’s suicide note
Toward the beginning of the chapter, you’ll split up with Manny. After, continue straight until you see the Spicy Dumpling building. Go through the alley next to it until you reach Tang Fabrics & Imports. Don’t go inside yet. Instead, turn around and jump through the open window. Inside that room, you’ll find the artifact, along with the Close Quarters training manual.
Plea to the Seraphite prophet
A little later on, you’ll jump over a wall into Chinatown. Enter the Ruby Dragon bar (third building on the left), and head upstairs. There are two Clickers at the top. Deal with them, then use the balcony to jump to the store across the street. Go up the stairs there, and you’ll find this artifact at the top, pinned to a corpse.
Jasmine Bakery safe
Go back down the stairs from the last collectible. Enter the room on your right, and you’ll find this artifact sitting on a cardboard box inside.
Strange relic
From the last collectible, head to the other side of the wall. This artifact is sitting on a table there. It’s the Precursor Orb from the Jak & Daxter series, and once you pick it up, you’ll unlock the bronze trophy Relic of Sages.
Seraphite prayer to prophet: Peace, victory, respect, steed, prosperity, and pairing
The next six artifacts are all located in the same area. Continue on the main story path until you come to a truck decorated with white flowers. There’s one artifact in the back of the truck, two hanging from the right side, two hanging from the left side, and one on the ground on the left side.
WLF soldier meets prophet letter
Enter the store to the right of the truck. This artifact is sitting on the counter inside.
Letter from Seraphite father to Son
Continue through the chapter until the next enemy encounter. After dealing with them, head into the building where the enemies were located and go upstairs. You’ll need to crawl under some rubble and move a filing cabinet at the end. Once you emerge, turn left to find a Scar camp. The artifact is sitting on a table there.
Chapter 30: The Forest
Failed truce
After the boss encounter with a woman wielding a pickaxe, open the garage to La Rosa’s Auto Shop. To the right, there’s a kitchen area with this artifact on one of the tables.
Chapter 31: The Coast
Infirmary note
A little way into the chapter, you’ll enter a ship through a hole in the side. In the hallway inside, turn right and head into the first room on your right. This artifact is on one of the cots inside.
Mutiny note
Continue through the chapter until you pick up the crossbow. Once you pick it up, don’t head up the stairs. Instead, continue down the hall with the crossbow to find this artifact on a cot at the end.
Ferry log
Head to the top deck of the ship and go toward the back. There are some Infected on the top deck, so be careful. In the room at the end, this artifact is laying on the floor next to a corpse.
Chapter 33: The Shortcut
Amputation supplies
This artifact is automatically in your inventory at the beginning of the chapter.
Survivor plea
Continue through the chapter until you need to jump across some isles to cross the river. Head inside the building on the other end and up the stairs. This artifact is on the floor in the room at the top of the stairs.
Neighbor exchange
Shortly after the last artifact, you’ll need to jump from a highway to an apartment balcony. This artifact is inside the apartment on a table in the hallway.
Scavenging list
A little later on, you’ll have to jump across some isles again. At the end, enter the Interbay phone store. The artifact is next to a corpse in front of the register.
Seraphite truce
Later in the chapter, Lev will jump across some support beams inside of a building while Abby goes through a side room. The artifact is on one of the desks in the side room.
Seraphite orders
Toward the end of the chapter, Abby and Lev will take a long elevator ride to the top of a building. Once that’s done, continue straight. The artifact is pinned to the wall outside of the next room you enter.
Chapter 34: The Descent
Gym safe code
From the start of the chapter, pass through the gym next to the pool. Enter the hallway to the right of the gym, and go inside the Orchards Juice Bar. This artifact is in the back office of the bar, pinned to the wall.
FEDRA orders
Continue on the main story path, and you’ll automatically pick up this artifact when you leave the fitness area.
FEDRA final note
A little later, you’ll use a fire hose to rappel down into a spore-infested area. At the bottom, enter the hole in the wall on your right. The artifact is inside, next to a corpse.
Chapter 35: Ground Zero
Annex letter
After you split up with Nora, continue straight until you reach a staircase. Don’t go down them yet. Instead, crawl under the rubble on your right into another room. The artifact is inside on the floor.
Soldier’s letter
Go down the stairs and, at the end, drop down a level. There should be a revolving door to your right. Next to the door, interact with the brown bag to pick up this artifact.
Chapel note
From the previous artifact, turn around and head inside the chapel. This artifact is sitting on the altar.
Patient’s note
Head out of the chapel and through the yellow door with a biohazard sign next to it. Continue through all three containment seals. Once you reach the next hallway, break the glass on the outside of room 24 (the second room on your right). The artifact is inside on a stretcher.
Doctor’s note
Leave the room and continue to the surgery area. The artifact is on a desk in the last room on your left.
Chapter 37: The Marina
Marina note
Toward the beginning of the chapter, you’ll need to swim through some water until you reach a pier. Once you reach the pier, don’t head up the ladder like you’re supposed to. Instead, walk to the end of the pier and enter the shop there through the window. The artifact is inside on the counter.
Chapter 38: The Island
WLF scout journal
At the beginning of the chapter, you’ll climb a tall ladder to a highway. At the top, there’s someone hanging from an exit sign. Directly beneath them, check the corpse on the ground for this artifact.
Venison distribution note
Continue on the main path until you reach a wooden hut. The artifact is inside the hut on one of the tables.
Mournful prayer note
After you spot Issac’s boat, continue forward until you’re in between two huts. The hut on the right has a shrine inside with this artifact pinned to the right wall.
Young Seraphite’s journal
This artifact is in the hut directly across from the previous one, next to a workbench.
Chapter 42: 2425 Constance
Artifact #122
On the road, head to the green ranch-style house on your left. There are some Infected inside, so be careful. The artifact is in the bathroom.
Chapter 43: Pushing Inland
Abby’s note
This chapter begins inside of a boat. Before leaving, check the counter on your left for the artifact.
Mansion note
Shortly after, you’ll need to jump a fence. Ellie will pause here, taking note of the Mesa Bluff Park sign. From here, head to the house on your right. The artifact is inside the garage next to the water heater.
Runaway warning
Eventually, you’ll need to climb on a roof where a Clicker is. Inside the house, head downstairs to the kitchen. The artifact is on the kitchen island, next to a workbench.
Chapter 44: The Resort
Santa Barbara slave note
A little further into the chapter, you’ll spot some prisoners being escorted in the distance. From here, continue straight until you spot a blood trail leading up to a concrete platform. The artifact is at the end of this blood trail.
Rattler’s letter home
Toward the end of the chapter, you’ll have an enemy encounter in a large area with a bunch of villas. Once you’ve dealt with the enemies, continue through the open villa and up a circular staircase. At the top, turn right, and you’ll find this artifact on a nightstand. As long you’ve followed this guide and picked up the journal entries, you’ll earn the Archivist trophy here. Congrats!
Editors’ Recommendations
So you have finished reading the artefact the last of us 2 topic article, if you find this article useful, please share it. Thank you very much. See more: last of us 2 collectibles, last of us 2 trading cards, powerpyx last of us 2 collectibles, the last of us part 2 locations, master set last of us 2, what is the strange artifact last of us 2, last of us 2 fetch, last of us 2 all notes